You may want to hire a company that will design a custom logo that will work well in a wide range of formats, to include embroidery.
If you prefer to create your own logo, we have some suggested guidelines to follow for creating a logo that translates well to embroidery, screen printing, and full color printing. Years of experience in the industry has given us some insight into what does and doesn’t work well. We’ve broken the thoughts down into the following areas:
Many professionally designed logos have blended colors or a transition from one color to another. This might look fine on paper, but is very difficult to accomplish in a small, left chest or cap size logo. While printing simply adjusts the dots of ink on the page or pixels on the computer monitor, embroidery has to try to accomplish this with segments of thread. It’s hard to embroider a blended color well, especially in a small digital logo.
If a blended logo is critical for you, then full color printing is the way to go. A large logo (such as to go on the back of a jacket) could look better as embroidery, but embroidery won’t be able to duplicate the look that can be achieved on paper or on your computer screen. Our advice is to not use blended colors at all if you don’t need them for embroidery or screen printing of your logo design.
SCREEN PRINTING: Not the best choice for blended colors because we use spot color for screen printing.
Our general guidelines are 3 to 3.75″ wide for logos wider than they are tall for embroidered use on the left chest of shirts. If the logo is square, 1.5 to 2″ on a side, and 2 to 2.5″ in diameter for circular logos. For caps, 2.25″ tall and 4″ wide are size limits, and 1 to 1.25″ tall and 4″ wide for visors. Full back logos (we only recommend putting them on materials no lighter than a sweatshirt) up to 11″ x 11″.
Often, the limiting factor in a logo’s size is small lettering or a thin, small part of the artwork. Don’t worry about sending us a larger logo than these guidelines – larger is better for digitizing. Sending one smaller might be a problem, since we need to enlarge it for digitizing. If we think something needs to be changed, we’ll let you know.
Left chest: Up to 4.5″ x 4.5″, but the size recommendations for embroidery hold true here. For a youth-size full back or front logo, up to 10″ x 10″. For an adult full back or full front logo, up to 12″ wide and 14″ in height.
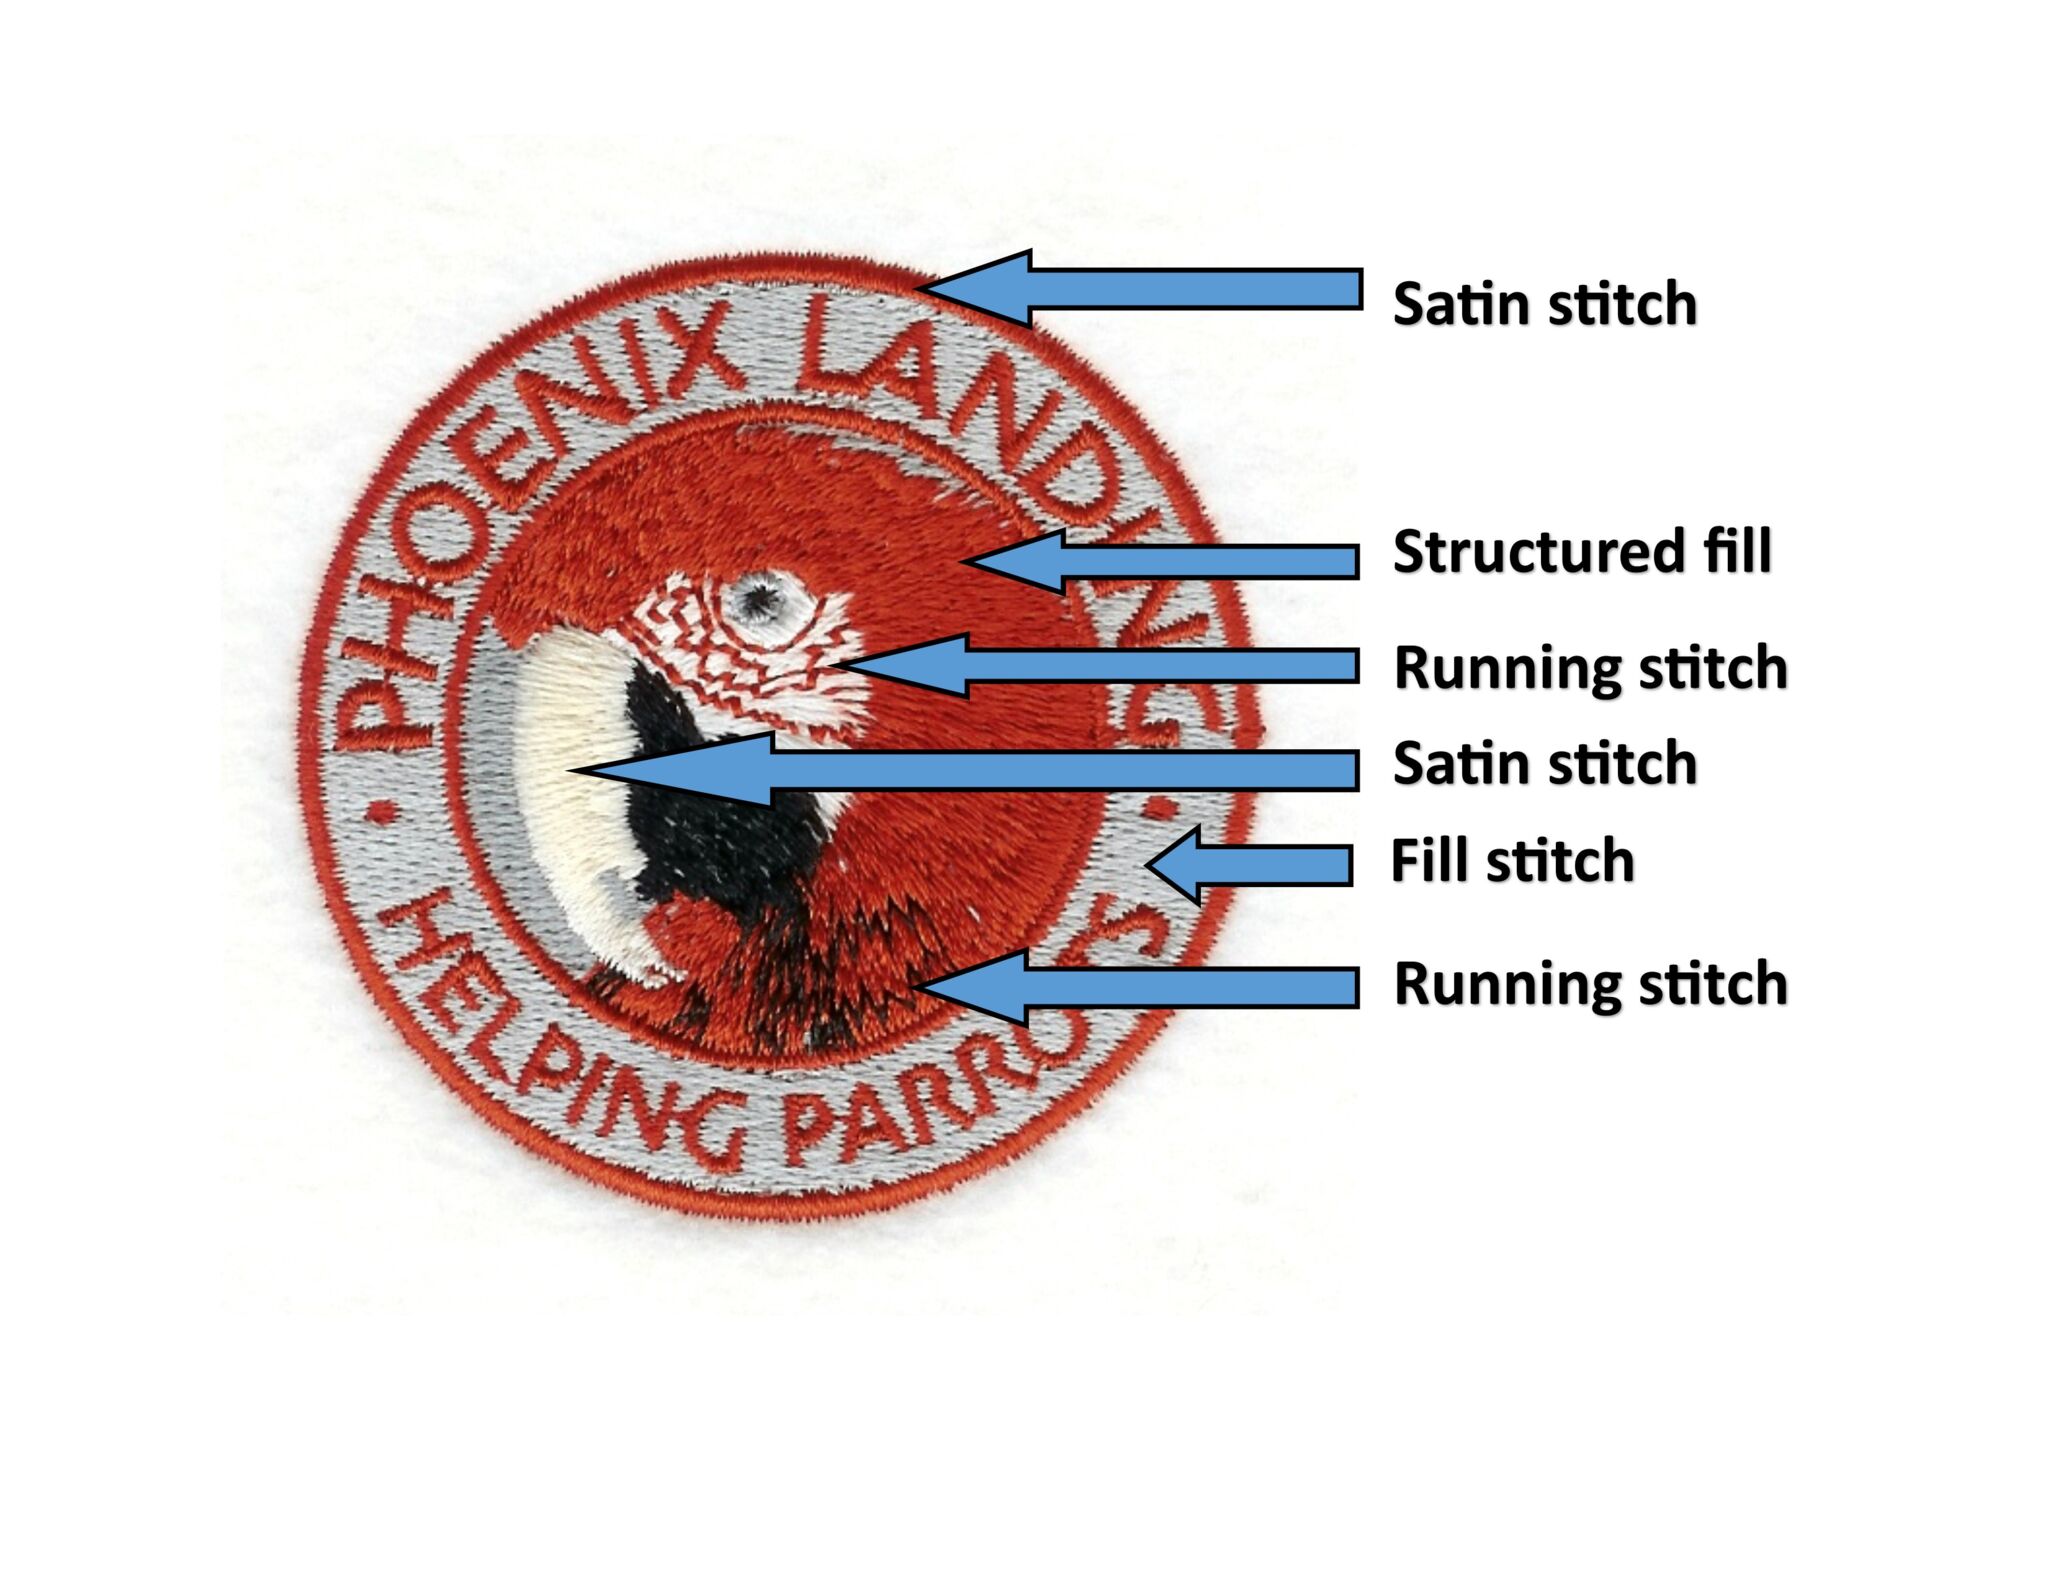
They are generally to be avoided. Embroidery has trouble duplicating the look of thin elements in logos because of the type of stitch that can be used. In lettering, for instance, we typically use the satin stitch. This stitch goes back-and-forth across the entire width of the area to be embroidered. For example, when we embroider our logo, the capital letter “I” is stitched by the needle going through the fabric on the left side of the letter (the bobbin thread forms a lock stitch with the top thread while the needle is in the ‘down’ position), pulling out of the fabric and moving to the right side of the letter where the needle once again goes through the fabric, a lock stitch is formed underneath by the bobbin thread, then the needle pulls out and moves back to the left side of the letter a little higher or lower that the first stitch. Back and forth… left, right, left, right, left, right, etc. gradually moving up or down the letter to create what we call satin (or column) stitches. It’s the best and most beautiful way to embroider things such as letters. If the letters are very thin, we can’t use satin stitches. The left to right distance across a thin “I” is too small and both stitches fall into the same area of the fabric and result in a hole in the fabric. If thin elements are necessary, other (less beautiful than satin) stitches such as running stitches can be used. In the example of a capital “I”, instead of forming the letter by going back and forth (left to right) across the letter many times (satin stitches), running stitches are placed one above the other. A stitch is placed at the very bottom of the letter, then the next stitch is directly above the first, the next is above that, and so on the top of the letter. The letter “I” made with running stitches might have only 20 stitches, while the satin stitch version might have several hundred. When there is a large area to be embroidered, we use fill stitches. They can be standard fill or a ‘structured’ fill (such as to replicate the look of feathers in the sample).
Very thin elements can also present difficulties for printing, depending upon the type and the apparel chosen.
It’s important that we know what type of material you’re going to want to have embroidered. For instance, t-shirt designs would have fewer stitches in them since the fabric is not as heavy as, say, denim, and simply can’t hold as many stitches. If we’re embroidering polyester fleece, the stitch type (and the ‘underlay’ stitches that you don’t see on the finished product) will be different than on other materials. Fleece has ‘loft’, meaning that it’s relatively thick and springy. If we don’t use proper underlay stitching to ‘squash’ down the fleece where satin stitches will be placed, stitches can be ‘lost’ in the springy fleece (and not be seen). This could lead to bits of the fleece poking through the stitching. All that said, most of the time we can use one logo on many different types of fabrics, but it looks best when we know in advance which fabrics and items are to embroidered (even on future orders) and can digitize the logo for embroidery accordingly.
The apparel selected for printing is even more important. We used to recommend fabric with at least a 35% cotton content. With today’s wide array of printing materials, we can print on just about anything (except caps of course) even the thin stretchy performance fabrics that are popular today. Printed logos bond extremely well to such fabrics and flex, bend and stretch with the fabric without cracking. We also need to know what color of garment you will be selecting. We may use different types of transfers on light and dark fabrics. We may choose somewhat different products based on both the fabric and color of the shirts being decorated. If you are using a mix of dark and light shirts, for example, a logo with dark lettering without a background color would be fine on the light colored items, but the dark text would not show up well against the dark colored items. A different color scheme or background color may be called for. We’ll let you know. We also recommend only selecting smooth fabrics such as t-shirts, sweatshirts and jersey knit polo shirts. No fleece, wool, or leather, and no pique knit polos (a non-smooth surface).
Caps must be embroidered on a different type of frame and cannot be held as securely as shirts. We only do embroidery or 3-D emblems on caps – no screen printing ot full color printing. Logos that have outlines around areas can be more difficult to embroider on caps since the cap may move ever so slightly between the stitching of the two different areas and have slight underlaps (or overlaps) where the fabric shows through.
Consider the colors of your logo in relation to the colors of the items you will want embroidered. If you want to stick with one color scheme for your logo, it may restrict what color items we can embroider for you. A mainly royal blue logo will look fine on a white item, but may not show up as well as you would like on a royal blue item. If you’re flexible in what colors we use for your logo, you can have a wider selection of apparel color to choose from. Another consideration in Pantone colors. There simply aren’t enough thread colors to match all Pantone colors. We will work with you to find a thread color that either matches or is very close to that selected for print media. We are able to change elements of your logo to different thread colors based on the shirt color – we can work that out in advance.
Unlike embroidery (which is priced based on number of stitches), screen printing is based on number of colors and full color printing is priced by size. Because we use different types of transfers for light or dark fabrics, and for different types of fabrics, we need to know exactly what you will want printed.